If you own a 3D printer, you must have 3D models to print. There are a lot of ready to print models to select online, but if you wish to make something truly out of the box, you need to design it yourself using a 3D design software.
Learning how to do such a design will enormously increase your DIY confidence, encourage you to make decorative designs, mechanical parts for robots, jigs for drawing even more items, and almost everything that comes to your mind.
This article will present you with some foundational modelling ideas. Still, to make the basics a little more joyful, We will do this by making out a cylindrical figure representing a cartoonish face.
Step 1: Learn The Basics of 3D Modeling
As a beginner, you need to learn the basics of 3D modeling if you are not already familiar with them. In case you have not gone to design school and have zero knowledge in 3D modeling, it’s important to familiarize yourself with the basics. You can check out the article on introduction to 3D modeling to learn more on the basics of 3D modeling. But in summary, you should familiarize yourself with:
- The Different Types of 3D modeling techniques.
There are various 3D modeling techniques available. These include: Solid modeling, Surface modeling, Sculpting, Box modeling, and many others. Surface modeling is where one starts by defining the shapes and curves of a model when designing. The designer has the ability to manipulate the entire design without facing any restrictions.
In Sculpting, a 3D designer uses the various sculpting brushes to manipulate an object to create a 3D model. With this technique, the only limitation is your imagination because with this technique you can be able to create any type of design with much ease.
In box modeling a primitive shape like a sphere, cube, or cylinder is modified using the various tools of a 3D modeling software to create the final shape. Several repetitive processes and tools are used to reach the final design.
In Solid modeling, a 3D designer usually starts by preparing the wireframe of a solid object to be created. Then later the wireframe is converted into a solid object. Operations like boolean, parametric modeling, and pick and place operations are used.

Solid modeling. Image source: All3dp
- Principles of Design
You need to be familiar with the various principles of design like deformations, manipulation, measurements, etc. Deformations is a principle where you modify the surfaces of a design. Manipulation on the other hand is where an already designed model is modified to suit one’s needs. This is usually important especially when downloading designs on websites like Myminifactory and Thingiverse and you find that it’s missing something or you want to add something like a text on it.
Measurement is the computation of the exact values of meshes. As a beginner, you need to know how to take measurements of your design so that you ensure there is success in your designs especially if they are to be 3D printed.
Step 2: Choose an Appropriate 3D Modeling Software

Image of a Design Software. Image Source: HubSpot Blog
To 3D design a model, you generally need to use a 3D design software. There are various 3D modeling software available in the market that you can choose from. However, many of them are complex and are very much costly. However, there are other easy to use 3D modeling software that are cheaper like TinkerCAD, SelfCAD, Onshape, etc. While choosing a 3D modeling software to use, you should consider the price, ease of use as well as its ability to perform the actions that you need.
For example, as a beginner, you should choose a 3D modeling software that fits your budget and should not be worried of your learning being cut short because of the budget issues. Also, you should choose a 3D modeling software that is easy to use and that won’t take you a lot of time to learn. As a beginner, you need a program that won’t discourage you on the way because of the complexity of the tools. Easy to use programs will even motivate you to continue learning and improving your 3D design skills.
Once you identify the software to use, you can then go ahead to create an account in the chosen software, then download and install the software on your laptop or computer if it requires downloading. Once you have set it up and the software is running, get yourself familiar with the basic concepts of navigating the work area.
Step 3: Learn The Basics of the Software

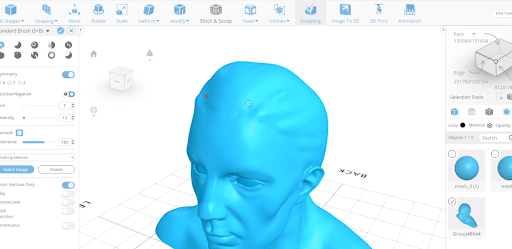
3D designing using SelfCAD software
As mentioned above, after you have identified the software to use, the next step is to learn how to use that particular software. There are a lot of ways that you can use to learn the software. You can begin with Youtube tutorials. Most software companies provide step by step Youtube videos of learning how to use their software. Once you are done with Youtube videos and have gotten to know the basics of the software, you can then look for a course on how to use the software.
You can get a good number of courses on Udemy, Coursera, and many other platforms that can help you learn how to use that particular software with much ease. After you have mastered how the software works, you can then go ahead and start practicing how to design models in the software. You can go back to Youtube and watch videos of how various designs are being created.
Other 3D modeling software like SelfCAD have interactive tutorials feature on their website that makes it easier for anyone to learn 3D modeling by actually designing models. Unlike the video tutorials or long form articles that sometimes one gets lost in the process maybe because the tutorial is too fast, the interactive tutorials will help you master 3D modeling with much ease and you don’t have to spend a lot of time figuring out how the various tools of the software works.
So, now your model is ready, but before you get printing, at the first run through a “pre-flight checklist” to ensure you are good to go.
Preparing to 3D Print Your Designs
If you would like to 3dprint your designs, it’s important to put some factors into consideration. These factors include:
- Slice Your Designs
After you are done with 3D modeling? It’s then the time now to convert your designs into a format that is 3D printable. You can do this using slicing software. There are various slicing programs like Cura. But if you are using programs like SelfCAD, you don’t have to struggle in switching to a slicing software in order to slice your designs as it has its own and you can do everything all under a single program.
Once you slice your design, you will generate the G-Code, which is a file format that is understood by a 3D printer and then you can feed it to the 3D printer using an SD card.
- Make sure the bed is level

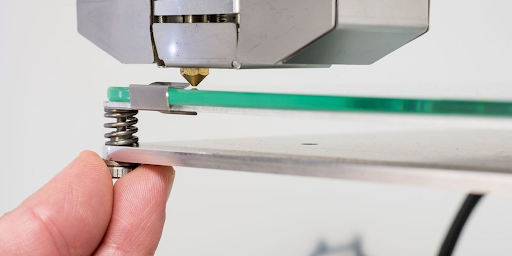
Leveling the bed of a 3D printer. Image source: Cults3d
Depending on the 3d printer you are using, there are different ways to level the bed. Some 3D printing users use inductive sensors to probe the bed while others have a switch that taps around the bed, and the rest need to be done manually.
If You have a manually levelled printer, you get two options: rotate the thumb screws below the bed to raise and lower every corner unless the entire bed is level to the nozzle, or MatterControl’s bed levelling is used, which precisely align your bed, even when it’s ridiculously skewed. If you like to try baby-stepping for levelling the bed, follow the instructions provided with the 3D printer.
- Adding the bed adhesive (when necessary)
Few materials need bed adhesives, and some need specific bonds too. There are too many filaments to run over all of them.
- Loading the filament
Few printers are Bowden, which means the extruder motor is not present on the print head; the other is a direct drive printer, which has an extruder motor on the print head and turns with it. Each method loads differently, hence following the guidance mentioned by the printer manufacturer. In all cases, ensure the nozzle is hot while changing the filament and that the colour reflecting from the nozzle is similar to the one you put in; check your filament is purged correctly.
- Loading SD card/plugging printer into the computer
They each possess pros and cons; Printing straight from your slicing software means one can baby-step the print if the bed is not as level as you like, but if the computer goes to sleep or restarts after an update, you can lose the pattern. Once everything is checked off, you are ready to get the print! Wait – here are some quick tips given, don’t run away just yet.
Get sure the initial layer is going down well. If it’s smearing, then you are too close; if you can see where exactly one line is laid down next to the other, then you are too far. You need to find that “Goldilocks spot.”
- Watching the first couple of layers.
Then the first layer can be fine, but the subsequent layers may face issues. Stay around for a little, even making sure everything is running smoothly.
- Don’t sit there for the entire print.
Proceed to check up on it regularly, and stay nearby, but you do not need to monitor it. At the experience level, once we have tested printers with short prints, we can observe that we can run weekend-long photos on them without worrying when we are in the office. For now, though it seems tempting, please do not sit there and watch every move of your print; once it is started and going smooth, pat yourself on the back, and grab a cold one, and kick back. Finally, Welcome to 3D printing.
Before we complete this article, let’s have a look at how you can prepare your 3D designs for laser engraving and laser cutting.
Preparing 3D models for Laser Cutting.
Before looking at how to prepare the 3D designs files for laser engraving and laser cutting, it’s important to know that you don’t necessarily need to have a CNC machine to be able to do laser engraving and laser cutting. You can turn your 3D printer into a powerful laser cutter and laser engraver when you have the right 3D printer attachment like a laser module. There are various lasers available. A good example is Endurance lasers that can engrave on different kinds of materials and they are available in different power outputs.

Laser cutting using Endurance lasers. Image source: Endurance lasers
To prepare your 3D model for laser cutting, you need to do some settings in your slicer. The first thing you need to do is define the material that you want to use. You can then define the dimensions and thickness and after this, you can then generate the G-Code to send to your CNC machine or 3D printer attached with a laser module.
For Laser Engraving, I recommend using 123D Make software to convert your 3D models to 2D Plans. Then you can use Corel Draw software to send the plans to either your laser machine or 3D printer.
Conclusion
It was a simple guide on how you can design your 3D models and even prepare them for 3D printing and laser cutting.
It might look difficult in the beginning, but once you start learning it will get easier and simpler and you can even build a successful business around this field.

Frank Partnoy is a tech blogger who loves to share his thoughts about the latest gadgets and technology. He loves everything from smartphones, laptops, tablets and more!


